How to use TADPOLE
ご使用時には以下の事項をご確認・ご理解をお願いします。
取り付け作業時の注意点:
1:当製品は使用者様にて取り付けが出来る仕様に設計をして居りますが、取り付け・セッティングに不安がある場合、専門知識をお持ちの業者様に委託される事をお勧めします。
2:取り付け・セッティング作業を行うにあたり、ウッドベース本体が不安定な状態で作業を行いますと、倒れるなど重大な破損につながる可能性がありますので、細心の注意を払って作業を行って下さい。
3:「音が出ない・付属品が足りない」など初期不良や不手際は迅速に交換など対応致します。商品がお手元に届いたら、早めの内容ご確認をお願いします。
IMPORTANT! Please Note:
Note on installation:
1:This product is designed to be installed by the user. However, if you are unsure about the installation or setting, we recommend that you entrust the work to a contractor who has expertise in the field.
2:When installing or setting up your bass, please be very careful not to do so while the bass is in an unstable condition, as this may lead to serious damage, such as the bass falling over.
3:We will promptly replace or otherwise deal with any initial defects or malfunctions, such as "no sound, missing accessories," etc. Please check the contents of the product as soon as possible after you receive it.
セッティング作業時の重要ポイントと注意点:
BUZZ セッティングについて:
当製品のセッティングにおける重要点は「位置・ネジの締め付け具合」です。
同じ位置でも締め具合で音色が変わります。色々お試しください。ネジを締めたままの位置移動は御止め下さい。傷の原因になります。セッティングを行う際は必ず、小さなボリュームからお試し下さい。お好みの音色位置が見つかってきたら、アンプのボリュームを徐々に上げて行くことをお勧めします。
BUZZ ハウリングについて:
ベース・アンプのセッティング・音量・距離など複数の要因でハウリングが出てしまう場合が有ります。アンプとベースの距離を開ける、向きを変えるなどでハウリング発生具合も変わります。当方実験開発で結果としては、イコライザーで「50Hz~120Hz」あたりの周波数帯を少し下げたり、アンプツマミの「LOW」を調整する事で、ハウリングをかなり抑制出来ます。
CLICKEY セッティングについて:
基本的にテープで貼り付けるだけな為、特筆するセッティング注意点は有りません。キチンと貼り付ける事位です。ハウリングの発生は起こり辛いです。極端な大音量では出てしまう場合もありますのでご注意下さい。音量不足をお感じになる場合など、必要に応じてプリアンプを併用したご使用をお勧めします。
上記ご理解の上、ご使用を頂けると幸いです。
Note on Setting:
BUZZ Setting:
The important point in setting up this product is the "position and tightness of the screws.
The tone will change depending on the degree of tightening, even in the same position. Please try various settings.
Please do not change the position of the screws while they are tightened. It may cause scratches. Please start from a small volume. Once you have found the good tone position, we recommend that you gradually increase the volume of the amplifier to test.
BUZZ How to reduce Howling:
Howling( Wolf Tone, Feedback) can occur due to multiple factors such as bass amp settings, volume, and distance. Opening the distance between the amp and the bass, changing the direction of the amp, etc. will also change the feedback. As a result of our experimental development, we have found that lowering the frequency range from 50Hz to 120Hz with the equalizer and adjusting the amp knob to "LOW" can suppress howling considerably.
CLICKEY Setting:
Basically, there is no special setting precaution to be noted, as it is simply taped on. The only thing to do is to stick it on properly. Feedback is unlikely to occur. Please note that it may occur at extremely high volumes. If you feel that the volume is not loud enough, we recommend using a preamplifier in combination with the product, if necessary. Thank you for your understanding.
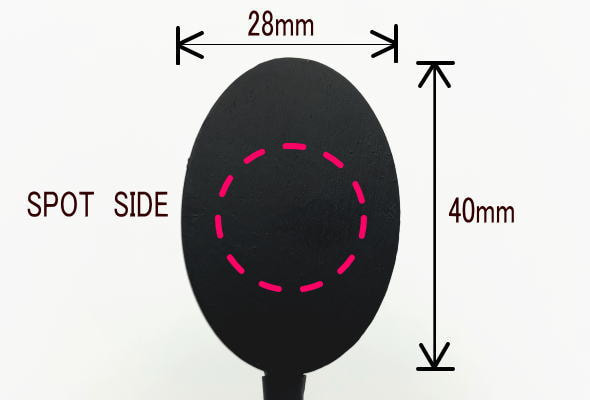
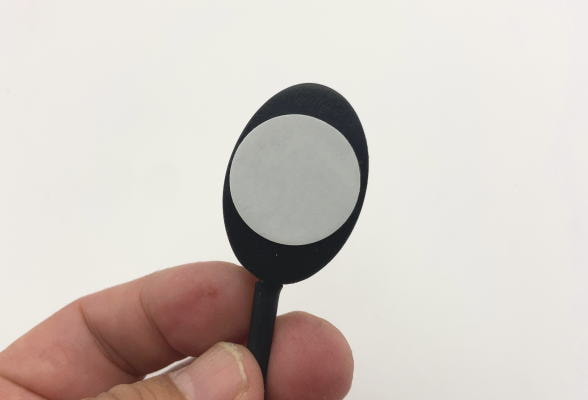
製品の受音部(SPOT部)は裏面(目の無い側)です。円形15mm程度。とても感度を重視して製作して居ります。
駒に取り付ける際(BUZZ)、並びに指板に貼り付ける際(CLICKEY)に、必ずSPOT部がピッタリと設置している事を確認し、ご使用をお願いします。
ケースのサイズは28mmx40mm となっております。BUZZを取り付けの際、ご使用の駒にアジャスタがある場合は、アジャスタとボディの間に28mm以上の隙間が無いと設置出来ません。その場合はアジャスタの上(弦側)に設置をしてご使用下さい。
The sound receiving part (SPOT part) of the product is the back side (the side without eyes). It is about 15 mm round. It is made with great sensitivity in mind.
Please make sure that the SPOT part is perfectly aligned when attaching it to the piece (BUZZ) or fingerboard (CLICKEY) before use.
When installing BUZZ, if the piece you are using has an adjuster, there must be a gap of 28mm or more between the adjuster and the body. In this case, please place the adjuster on top of the adjuster (on the string side).
TADPOLE BUZZ How to Mount
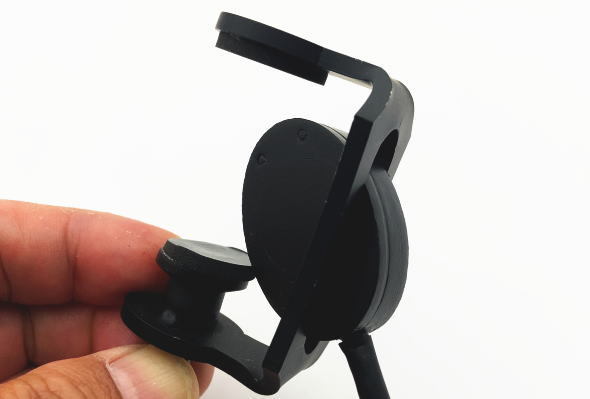
付属のクランプ金具、固定ネジを一番広い状態まで広げ、金具の裏側にある溝部からケースを挿入します。
Step 1. Spread the mounting clamp to the widest state, and insert the case through the groove on the back side.
Step 1. Spread the mounting clamp to the widest state, and insert the case through the groove on the back side.
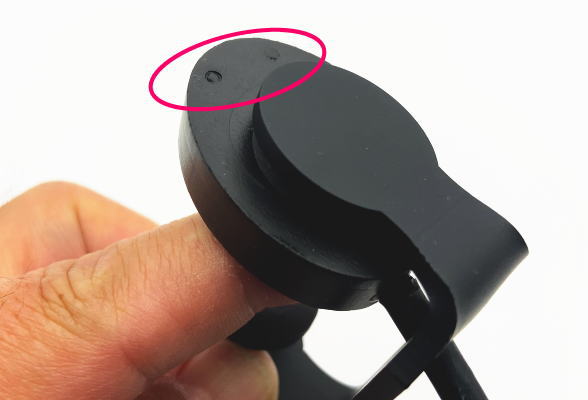
コンタクト部ケース、オタマジャクシの”目”が、金具側に接する様に向きを調整します。この時、クランプ金具がコンタクト部ケースの中心に来る様に設置して下さい。
Step 2. Adjust the wooden case so that the "eyes" of the tadpole are in contact with the clamp side. At this time, the clamp should be placed in the center of the contact case.
Step 2. Adjust the wooden case so that the "eyes" of the tadpole are in contact with the clamp side. At this time, the clamp should be placed in the center of the contact case.
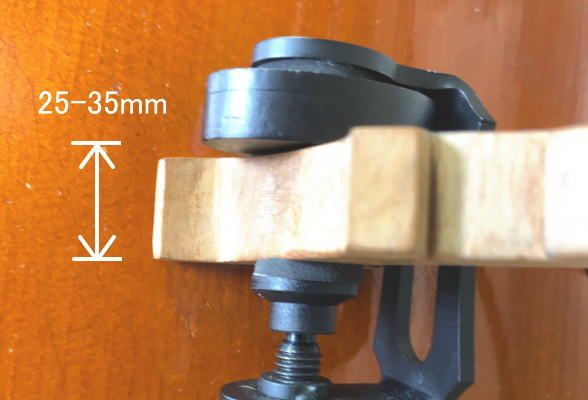
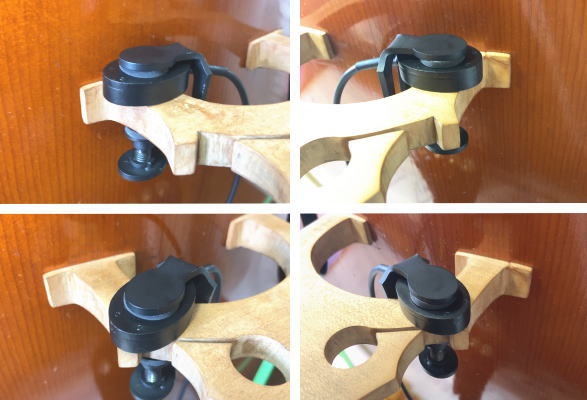
駒に設置します。ネジ部を手で締めて軽く固定します。駒の取り付け可能な厚みは25-35mmです。駒の面にSPOT部がピッタリと付くように確認してください。駒の形状はベースの個体毎に異なります。お使いのベース、ネック側の面が湾曲面形状に削られている事も想定されます。状況により駒の下面へ取り付けも検討下さい。
Step 3. Mount it to the bridge. Tighten it by hand lightly. The thickness of the piece that can be installed is 25-35 mm. Make sure that the SPOT section is perfectly aligned with the surface of the piece. The shape of the bridge is different for each individual bass. It is possible that your bass has a curved surface on the neck side. Depending on the situation, please consider attaching the SPOT to the underside of the piece.
Step 3. Mount it to the bridge. Tighten it by hand lightly. The thickness of the piece that can be installed is 25-35 mm. Make sure that the SPOT section is perfectly aligned with the surface of the piece. The shape of the bridge is different for each individual bass. It is possible that your bass has a curved surface on the neck side. Depending on the situation, please consider attaching the SPOT to the underside of the piece.
図の様に取り付けが出来たら初期準備完了です。ネジ側の駒に当たる部分は角度変更が出来る様に設計しています。駒の両面がキチンと密着している様に心がけてください。
Step 4. The initial preparation is complete when the mounting is completed as shown in the figure. The part of the screw side that touches the piece is flexible. Please make sure that the two sides of the piece are tightly adhered to each other.
Step 4. The initial preparation is complete when the mounting is completed as shown in the figure. The part of the screw side that touches the piece is flexible. Please make sure that the two sides of the piece are tightly adhered to each other.
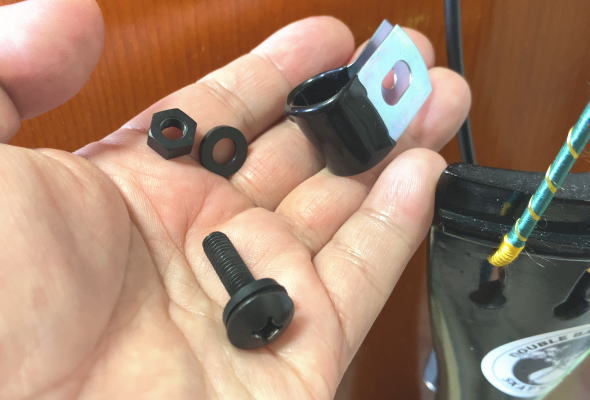
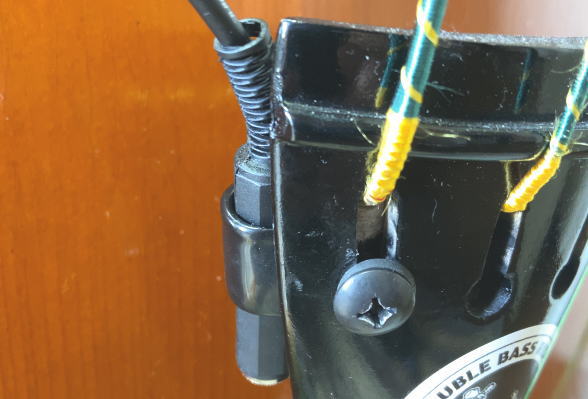
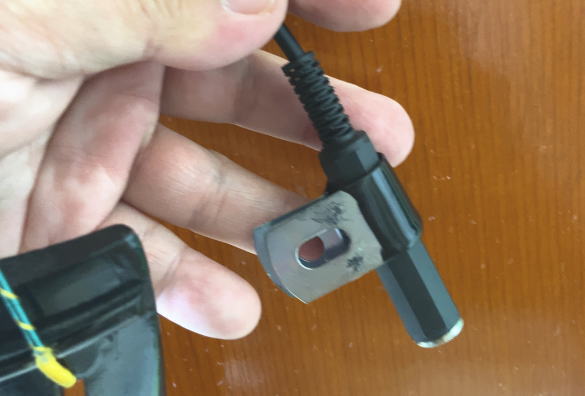
プラグをテイルピースに金具で固定します。付属の金具からネジ、ナットを外します。ネジ側にゴムワッシャ、ナット側にプラスチップワッシャを挟み使用します。
Step 5. Mount the plug to the tailpiece with the jack mount. Remove the screws and nuts from the supplied fittings. Use a rubber washer on the screw side and a plastic tip washer across the nut side.
Step 5. Mount the plug to the tailpiece with the jack mount. Remove the screws and nuts from the supplied fittings. Use a rubber washer on the screw side and a plastic tip washer across the nut side.
裏側のナットを持ちながら、お手持ちのドライバーで締め付け固定し完成です。
※必要に応じ、メガネレンチ等で裏側のナットを固定して下さい。
以上で取付は完了となります。
Step 6. While holding the nut on the back side, tighten and secure with a screwdriver.
If necessary, use a wrench to secure the nut on the back side.
This completes the installation.
※必要に応じ、メガネレンチ等で裏側のナットを固定して下さい。
以上で取付は完了となります。
Step 6. While holding the nut on the back side, tighten and secure with a screwdriver.
If necessary, use a wrench to secure the nut on the back side.
This completes the installation.
TADPOLE BUZZ How to Adjust
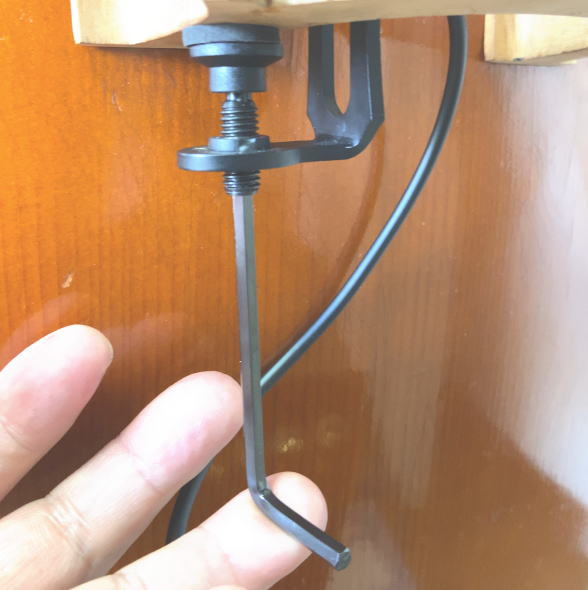
手で締めた緩い状態から、付属のレンチで締め付けを行います。取り付けを行う位置・締め付け具合がセッティングの最重要点です。
ハウリングし辛い位置、好みの位置をアンプの出音を確認しながら、変更してみてください。数mm移動するだけでニュアンスが変わります。
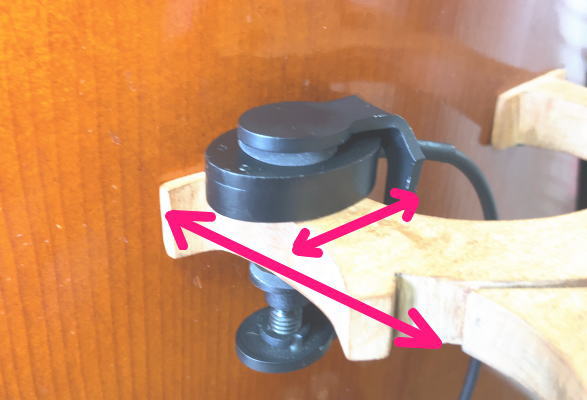
・ベース正面向かって左右方向(上図小さい矢印方向):
受音位置補正程度数mmの移動でニュアンス変わります。
・ベース向かって上下方向(上図大きい矢印方向):
弦側に寄せる=フィンガリングニュアンス強くなる
ベース側に寄せる=ボディ反響音(ロー)のニュアンス強くなる
注意!!
取り付け位置の変更を行う作業は、 固定ネジを緩めるーケースを移動するー締める という一連の作業を行って下さい。
締めこんだままの移動はキズの原因となります。
From a loose hand-tightened position, tighten with the supplied wrench. The position and tightness of the installation is the most important aspect of the setting.
Adjust your amp's output and try to find the position that has less feedback and the position that you prefer. Just a few mm of movement will change the tone.
The position of the bass is the left/right direction toward the front of the bass (small arrow direction in the above figure):
Just a few mm of movement will change the tone.
Vertical direction toward the bass (large arrows in the above figure):
Pulling toward the string side = Stronger fingering tone.
Toward the bass = Stronger body (low) tone.
ATTENTION!!
When mounting our product, perform the following sequence of operations:
loosen the fixing screws, move the case, and tighten the screws.
Moving the case while the screws are tightened may cause scratches on the bass body.
商品説明にある「セッティング変更が可能」の参考例です。魂柱側に設置も可能です。弦のアタック感はより強く認識出来ます。
音の表現を文字にするのはとても難しく、プレイヤー様毎に感性が異なります。色々お試し頂ければと思います。
製作者のおすすめ(好きな)位置は「図中左上」のバスバー側、ベースボディ寄りです。駒のウィングに掛かる様に設置すると、製作者のベースは振動が多く、物凄い不快な音が出ます。ウッドベースの弦が凄く振動している事が判ります。.
Mount Example
It can also be installed on the sound post side. The attack of the strings can be recognized more strongly.
It is very difficult to describe the sound in words, and each player has his/her own sensitivity. We hope that you will try various ways to express the sound.
The position that the maker recommends (or likes) is "upper left" in the figure.
For example, if the bass is placed so that it hangs on the wing of the piece, my bass will vibrate a lot and produce a very unpleasant sound.
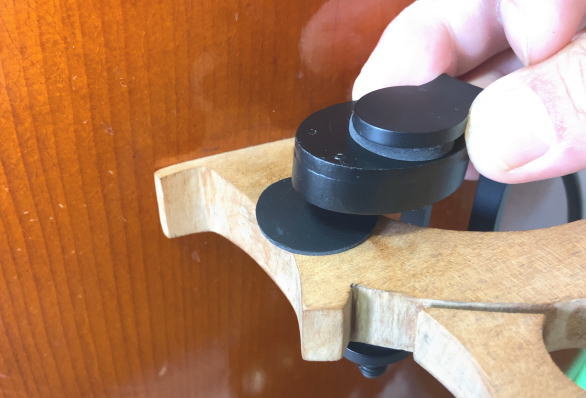
好みの位置は見つかったけど、感度が高すぎるとお感じになる場合、付属のゴム板を挟んで固定したりすると、感度が鈍く成ります。お試し頂ければと思います。
If you find a position that you like, but feel that the sensitivity is too high, try inserting the attached rubber sheet between the bridge and pickup.
If you find a position that you like, but feel that the sensitivity is too high, try inserting the attached rubber sheet between the bridge and pickup.
TADPOLE CLIKEY How to Mount
コンタクト部、ケースの中心、SPOT部にキット付属の両面テープを1枚貼り付けます。
Attach one piece of double-sided tape supplied with the kit to the pickup, the center of the wooden case( the SPOT).
Attach one piece of double-sided tape supplied with the kit to the pickup, the center of the wooden case( the SPOT).
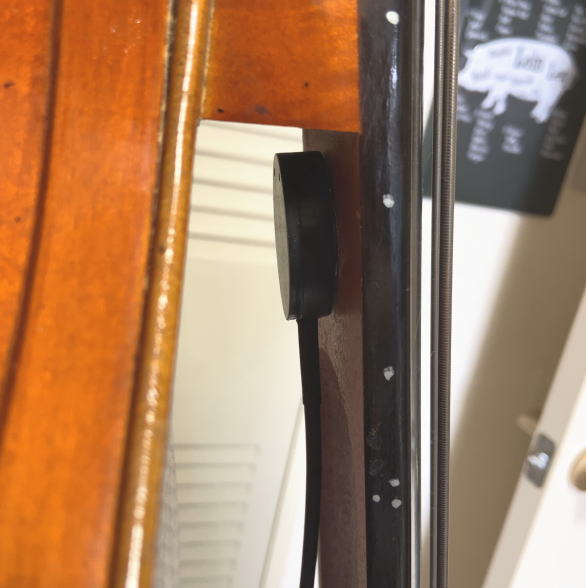
両面テープの保護紙を剥がし、指板裏の平らな部分に貼り付けます。多少の位置のズレで音色は大きく変化しません。おおよそ中心辺りを狙って貼り付けて下さい。
Remove the protective paper from the double-sided tape and affix it to a flat area on the back of the fingerboard. A slight deviation in position will not significantly change the tone. Aim at the approximate center of the fingerboard.
注意!!
指板裏のポケット形状に削られた、湾曲部分への貼り付けは正しく音を拾えませんのでお勧めしません。
ATTENTION!!
We do not recommend attaching it to the curved part of the back of the fingerboard, which is cut into a pocket shape, as it will not pick up the sound correctly.
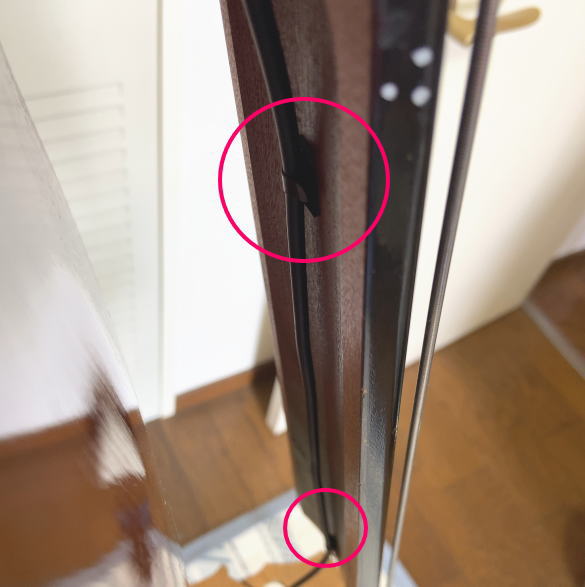
キットに付属の粘着剤付きケーブルクランプを数個使用し、適宜ケーブルの固定をしてください。2-3箇所固定すれば余計な振動を拾わないと考えます。
Use several cable clips with adhesive included in the kit to secure the cable accordingly. 2-3 cable clips should be enough to avoid picking up excess vibration.
Use several cable clips with adhesive included in the kit to secure the cable accordingly. 2-3 cable clips should be enough to avoid picking up excess vibration.
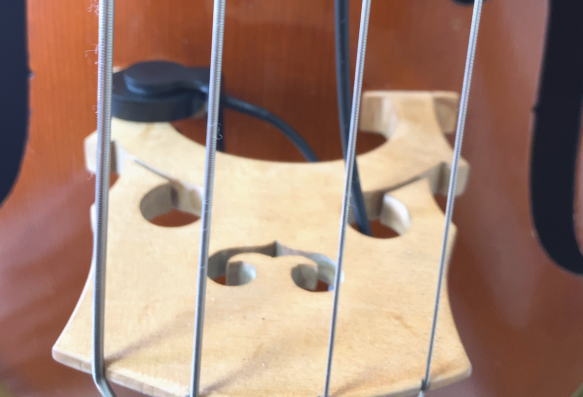
ケーブルを固定する為の処理を行います。必須事項ではありませんが、製作者は駒ウィングの穴を通してます。駒の”股”を通しても良いでしょう。駒のちょうど下辺り、「ボディにケーブルクランプで貼り付け固定」したり、「駒に固定」したりでも良いと思います。演奏中に揺れて各所に振れると、音として拾ってしいます。余計な振動を拾わない様に処理する事が重要です。
This process is used to secure the cable. Although it is not required, I use a hole in the wing of the piece. You can also put it through the "crotch" of the piece. It can be "mount to the body with a cable clip" or "mount to the piece" just below the piece. If the strings are shaken in various places while playing, they will pick up noise. It is important to handle it in such a way that it does not pick up unnecessary vibrations.
This process is used to secure the cable. Although it is not required, I use a hole in the wing of the piece. You can also put it through the "crotch" of the piece. It can be "mount to the body with a cable clip" or "mount to the piece" just below the piece. If the strings are shaken in various places while playing, they will pick up noise. It is important to handle it in such a way that it does not pick up unnecessary vibrations.
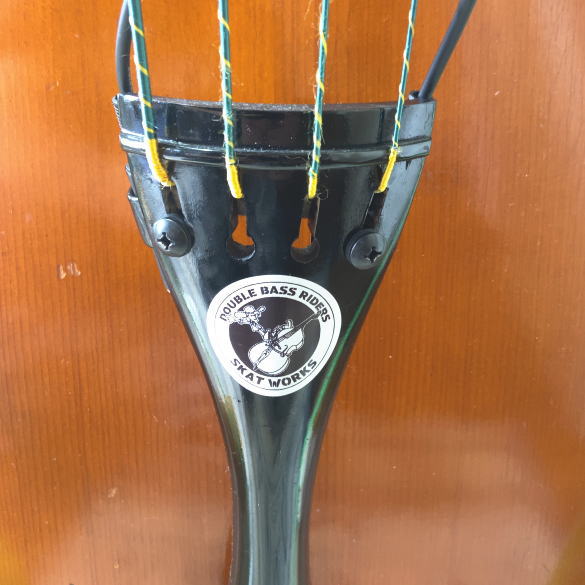
BUZZ同様にテイルピースにネジで固定を行います。
Mount jacks are used to secure it to the tailpiece. Same as the BUZZ.
Mount jacks are used to secure it to the tailpiece. Same as the BUZZ.
以上で完成です。左右どちらに固定するかはお好みで決めて下さい。
以上で完了となります。
You can decide whether to mount them on the left or right side as you like.
All done!
以上で完了となります。
You can decide whether to mount them on the left or right side as you like.
All done!

